Deferred Shading in OpenGL ES 3, Part I: Setting up
15 Sep 2014 •When OpenGL ES 3.0 became available on iOS devices equipped with the Apple A7 GPU, I decided to revisit the deferred renderer I had implemented a while back, mainly due to the addition of MRT, or Multiple Render Targets. What MRT allows you to do is output to multiple color attachments on a single frame buffer from the same fragment shader. Now, while implementing deferred shading without MRT is of course possible, it requires multiple render passes of the scene to fill up all the required buffers, which can greatly sacrifice performance.
OpenGL ES 3.0 comes with quite a few other nice additions as well, such as GLSL ES 3.0 (with syntax resembling that of desktop OpenGL), occlusion queries, transform feedback, and instanced rendering. Very nice list of features indeed, but for the purposes of this series of posts I will be focusing on my implementation of a deferred renderer on iOS 7, hopefully leaving room for other features to be covered in coming posts. Hence, what I will be presenting is a complete yet basic solution to deferred shading, which should be useful enough regardless of the reader’s target platform as long as some level of familiarity with deferred rendering is assumed.
The first step is to create our so-called G-buffer (some texts define it as geometry buffer, while others go for graphics buffer). Now, what you put in the G-buffer depends on your specific needs and what your renderer cares about, but chances are you will store, among other things, a diffuse color for your surfaces, along with normals and a way of specifying world-space positions. My final implementation ended up using three RGBA8888 color buffers. The first color attachment holds a three-component diffuse color and a float for specularity/shininess, the second one a three-component world-space normal (with the alpha unused), and the third buffer is used to pack a single float representing depth into all four RGBA channels.
Since world-space position can be easily calculated using screen-space coordinates and fragment depth, I chose to store depth (as opposed to world-space position which is seen in some implementations) and dedicate an entire 32-bit buffer to it in order to get the maximum precision. It’s worth noting that the glorious 32-bit float render target is not part of the OpenGL ES 3.0 implementation on iOS 7, whereas its less-impressive 16-bit half-float sibling is. I’ll go more in depth as to how the packing of a 32-bit float into four 8-bit channels is done, but for now let me mention that while it would have been possible to use a half-float color attachment for storing depth and distribute precision into two or four components (as will be explained in my implementation of Variance Shadow Mapping), I found that having multiple color render targets of various sizes/types attached to a single frame buffer drops frame rate significantly.
Our G-buffer also comes equipped with its own depth and stencil attachments, both of which will later be utilized in the lighting pass. To fill up the G-buffer we run our first render pass of the scene. We can also disable blending since our G-buffer will only store information pertaining to the foremost fragment (which the depth buffer so kindly takes care of for us) and hence any translucent surfaces will end up as opaque. This is one of the shortcomings of deferred rendering, but there are certain workarounds already out there.
It’s worth noting that the color attachment containing normals needs its first three components cleared to 0.5. This is due to the scale and bias that’s later used when extracting normals, which will remap each component from [0.0, 1.0] to [-1.0, 1.0]. This way we are defaulting to normals of length zero where no geometry is rendered, effectively zeroing out any lighting contributions where no surfaces are involved. Similarly, the color attachment which packs depth information can be cleared to 1.0, since as we’ll see later, unpacking this depth value from the 32-bit RGBA buffer will result in a value of 1.0 (lying on the far clipping plane), similar to the usual clear value of a depth buffer in OpenGL.
Let’s dive into the shaders responsible for populating the G-buffer, starting with the vertex shader:
A quick note on the #ifdef seen in the shader above: the engine that I work with is capable of dynamically injecting pound defines into shaders and recompiling a new variation if necessary. So, in case of the G-buffer fill shader there exists a variation used for surfaces with a normal map assigned, which outputs vertex tangents to the fragment shader. If a surface does not have a normal map attached, the overhead of transforming and copying tangents is eliminated.
The vertex shader used in this pass should be mostly self-explanatory. A few per-vertex attributes are being interpolated and passed along to the fragment shader, including clip-space position (before homogenization, or division by w), UV texture coordinates, surface normal (and optional tangent), and homogenized depth. Note that depth is being taken to normalized device coordinates and mapped to [-1.0, 1.0], a more suitable range for being stored in a non-float texture. Also, as a side note, make sure you transform tangents (and bi-tangents) with the model matrix and not the matrix used to transform normals. Tangent vectors flow with the surface and need to go through the same transformations as the model itself. A good explanation of why normals are a special case when it comes to transformation can be found at Akenine- Möller, Tomas, Eric Haines, and Naty Hoffman, Real-Time Rendering, Third Edition, Taylor and Francis Group, pp. 63-64, 2008.
The first thing to note is how the shader defines its output as three separate color attachments using out vec4 fragColor[3]. This fragment shader is responsible for deciding on a diffuse color, specular factor, surface normal, and depth for any given fragment based on material properties. As you can see, if the surface has a diffuse texture the color will be fetched using a texture lookup and if not, a simple base color will be used. Similarly, should a specular map be present the shader will fetch the specular factor from the texture, and if not it will rely on a single float uniform passed in to the shader. Note that while I’m using luminance as a measure of specular intensity extracted from the texture, your implementation might use a different method such as looking solely at the green channel of the specular map.
In order to implement normal mapping (provided that a normal map has been assigned to the surface material), fragment normal and tangent are fed to normal_from_map, which outputs the bent normal in world space. Since our normal maps are in tangent space, we use a basis formed by the fragment normal, tangent, and bi-tangent to transform the normal extracted from the texture (and remapped to [-1.0, 1.0] after a scale and bias) to world space. As for fragment depth, pack_depth takes care of packing homogenized depth into an 8 bit per channel RGBA texture, which significantly increases precision. Again, modern hardware and APIs allow for use of float textures with much higher precision, though the OpenGL ES 3.0 implementation on Apple A7 is not quite there yet.
These two shaders, aside from support for normal and specular mapping, are possibly the most primitive they can be; yet they lay the foundation for our deferred rendering pipeline. The output of running a pass over our scene using the program above can be seen in the images that follow. Note that the alpha channel of the first color buffer – representing specularity – has been disabled, and that the buffer packing depth information does not make any visual sense and hence is accompanied by a capture of the 24-bit depth buffer.
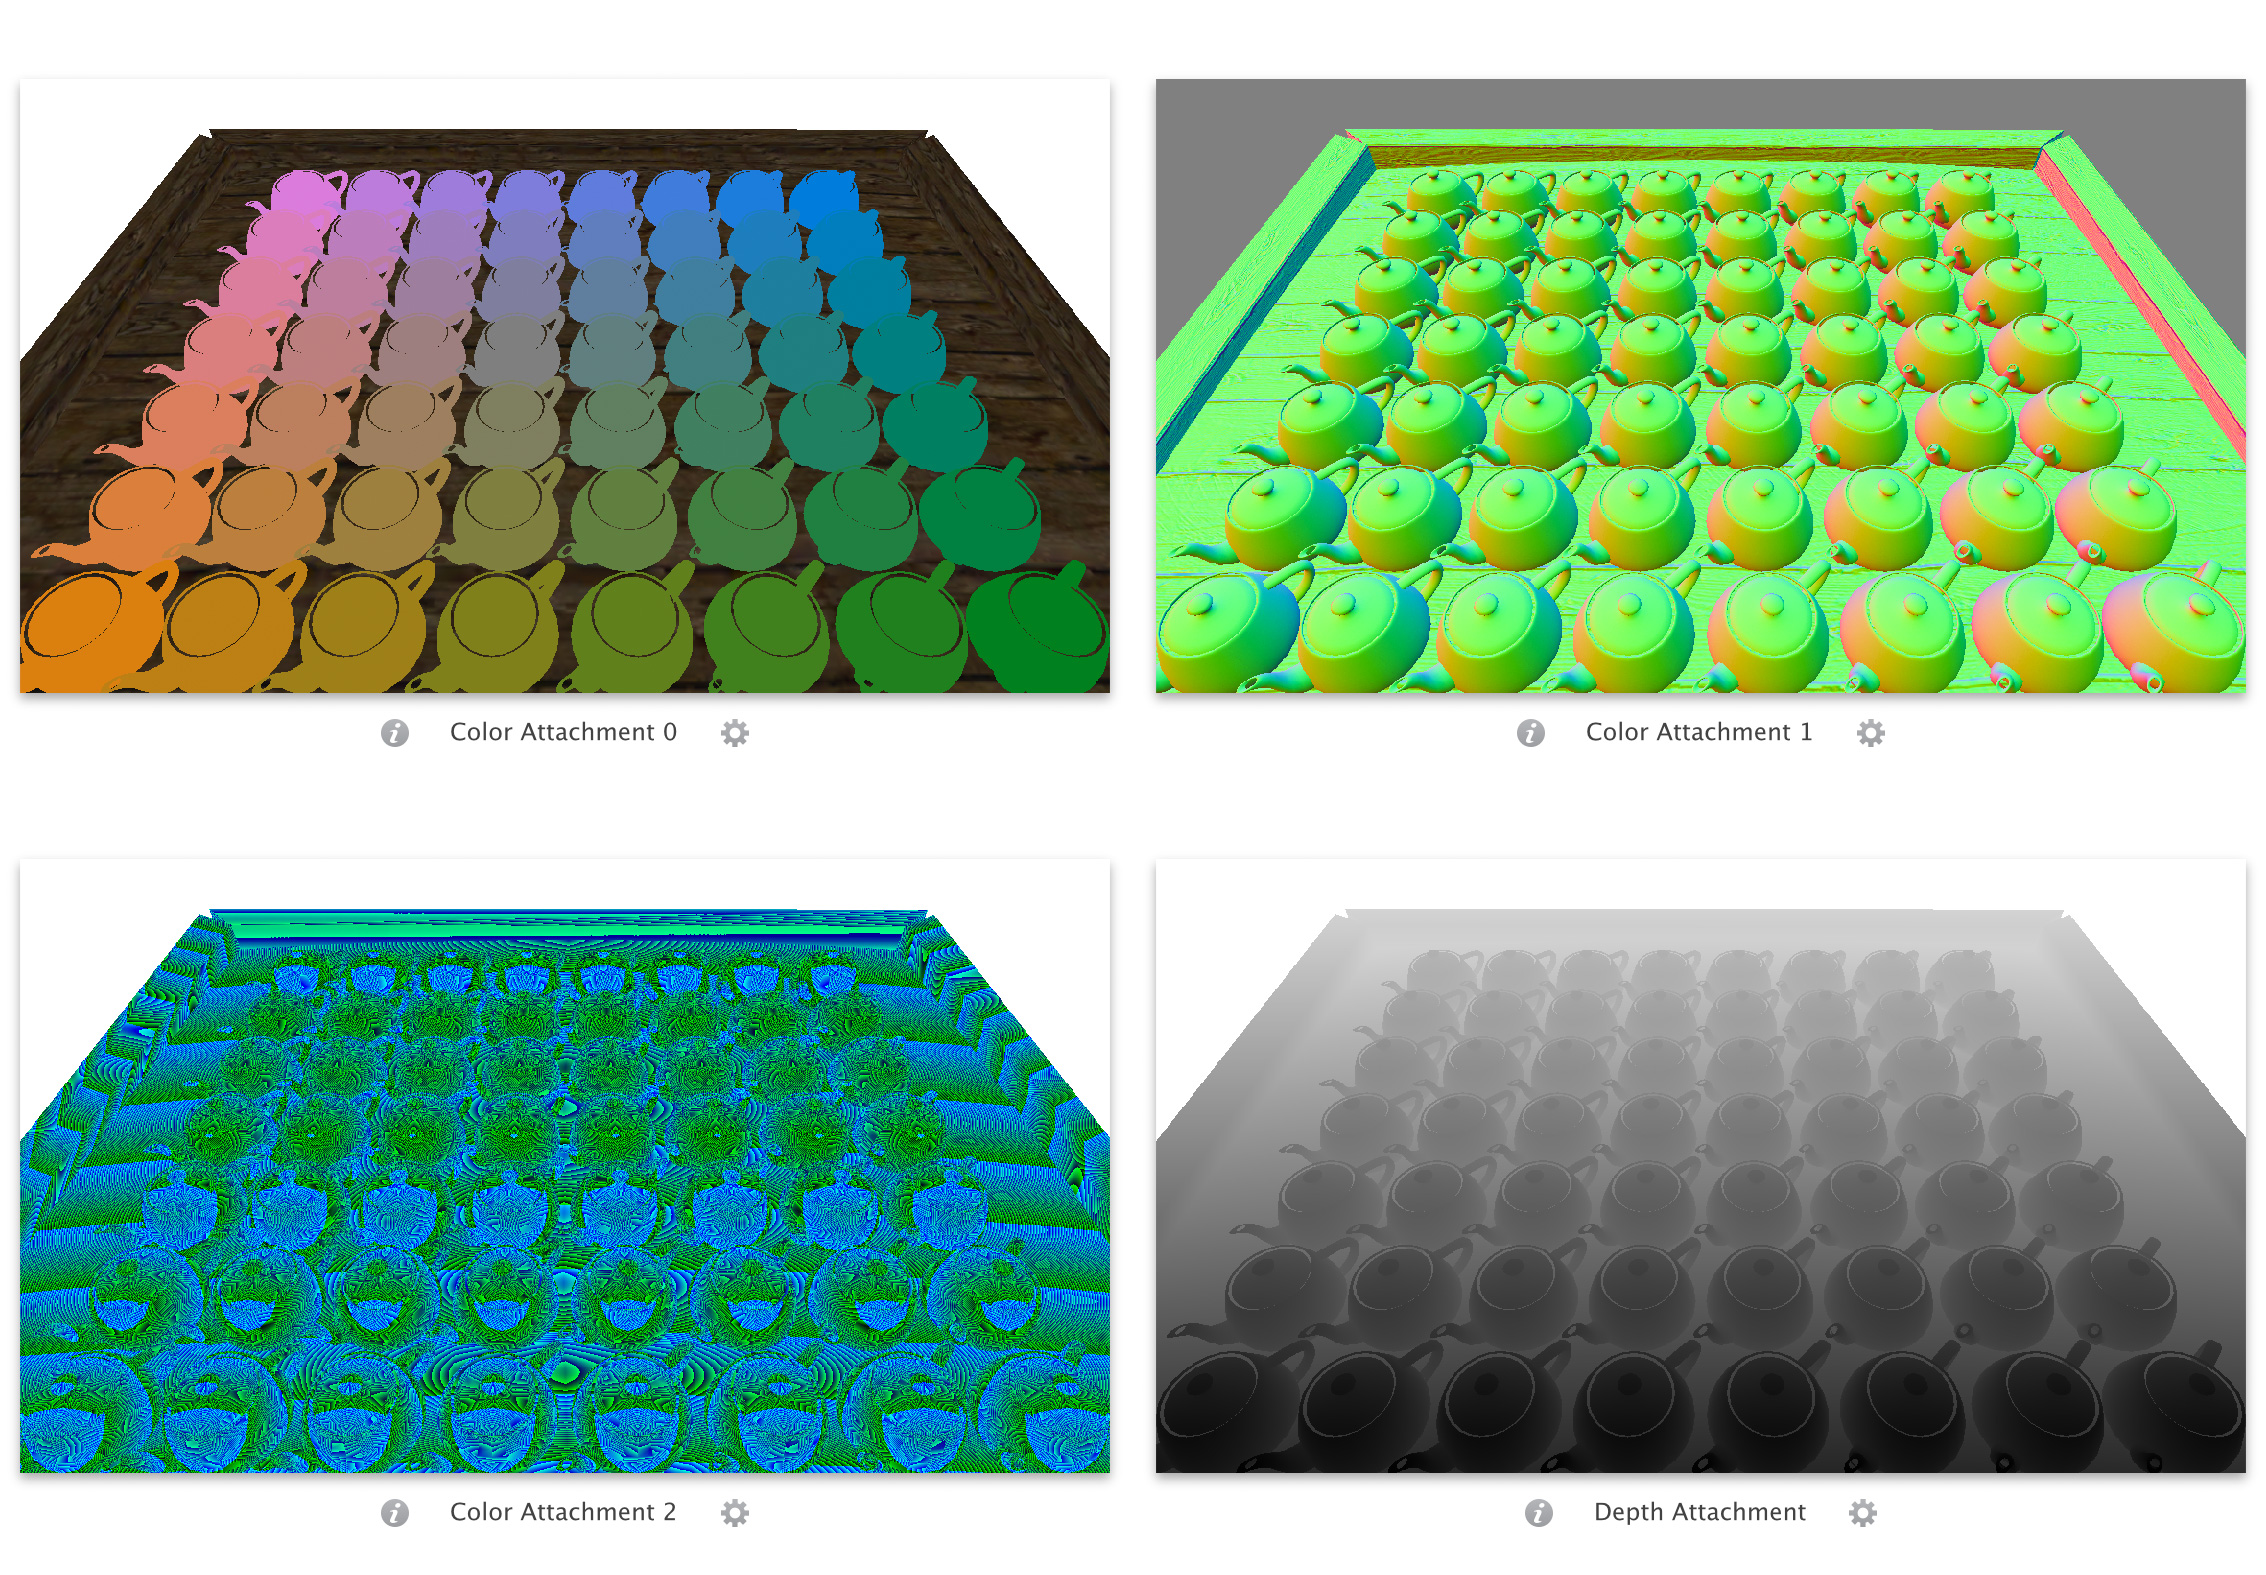
I should mention that aside from borrowing the Utah Teapot mesh, the scene in the screenshots – which served as the perfect test bed for the few futures supported by our deferred renderer – is inspired by one of John Chapman’s blog entries. Lastly, if you prefer a bit more fundamental explanation of deferred shading or even many other rendering techniques and algorithms, I would recommend checking out Etay Meiri’s OpenGL tutorial series.